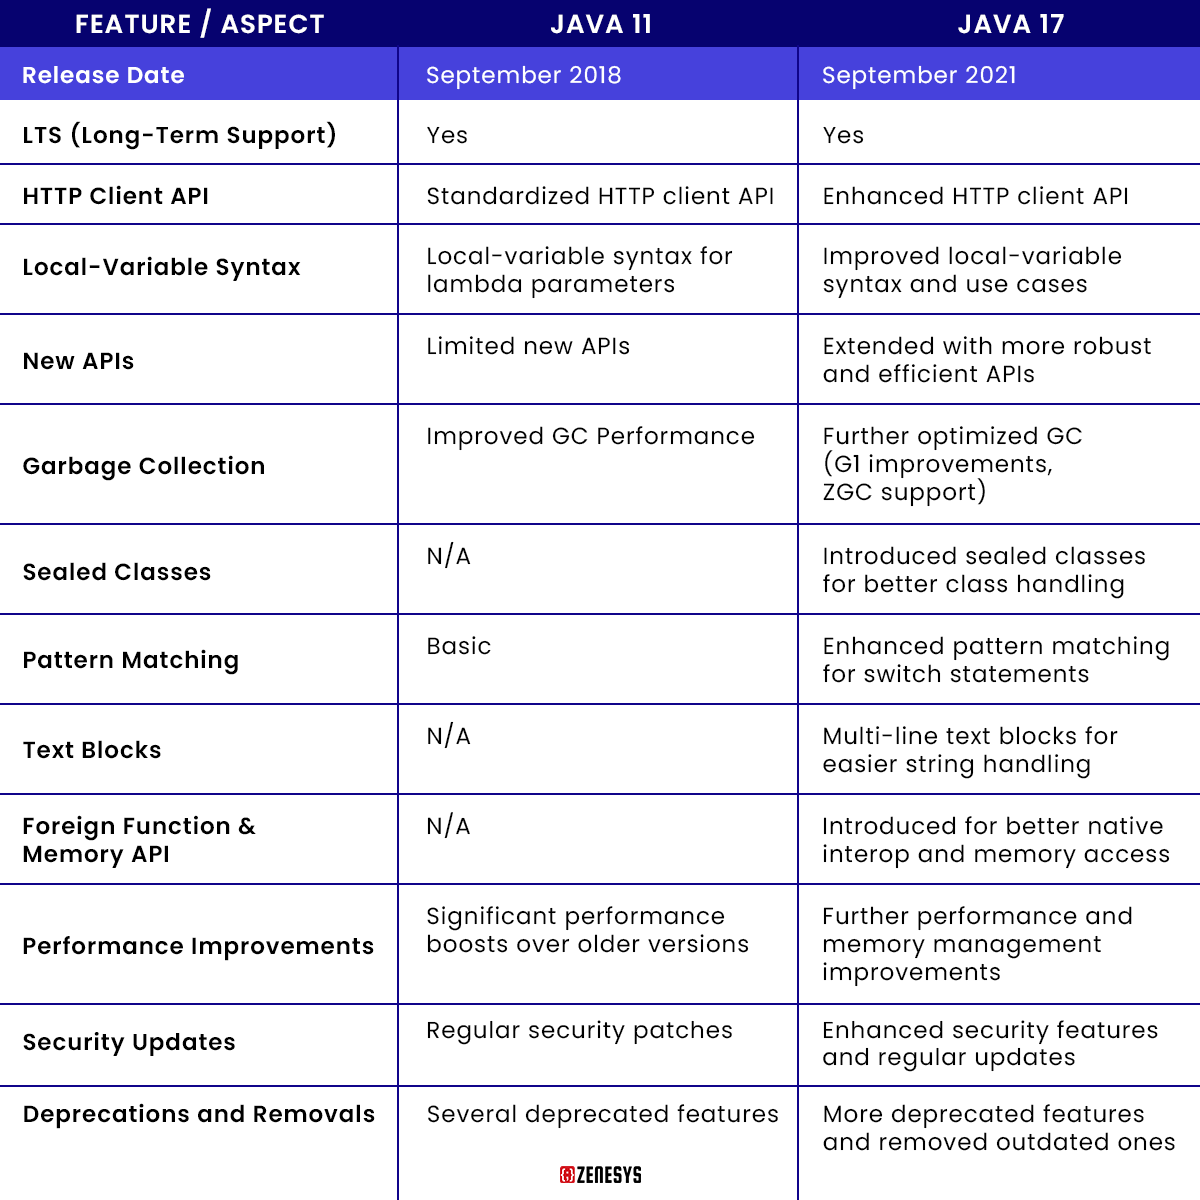
Migrating a project from Java 11 to Java 17 might seem like a daunting task, but it's crucial for keeping your software up-to-date and secure. The inefficiency in Java leads to slow execution of applications and compatibility problems with other applications, which puts everything at security risk. If your team is still deploying with Java 11, you can bear some new features and optimization in Java 17. The upgrading can enhance various vital aspects: the application speed, the level of protection, and other essential features that will benefit you as a developer.
Java 17 is the most recent LTS release, and it comes with many great features that will enhance your work. If you can think of it in those terms, imagine giving your project the updates and servicing it deserves. Java 17 comes with improved garbage collectors, new APIs, and improved memory management, making your applications perform with improved efficiency. It is also important to be up to date with the most current version mainly because this can put one on par with current production and trends. Therefore, many companies hire Java developer proficient in Java 17 or a digital transformation company with a strong portfolio.
Java 11 vs Java 17
These are issues of performance, new application programming interfaces, and better garbage collectors, among others. The inclusion of sealed classes is an improvement for working with class hierarchies. Not only do you receive new objects from playing with Java 17, but it also points to the future, ushering your projects and their favourable qualities for the future.
.png)
How to Migrate from Java 11 to Java 17?
Step 1: Current setting up of the process
If you don't have a proper Java 11 environment up and running, make sure you do. List all the libraries and dependencies your project needs. Do not forget to write down any changes you have made that have been anathema to the regular usage of the products, including customized settings and modifications, you can also hire java developer for the assistance.- List Dependencies: The following are some commands for listing all dependencies; for Gradle, use the included commands.
- Check Compatibility: Make sure that these dependencies are supported by the current Java version – Java 17.
Step 2: Setting Java 17
In this case, Java 17 must be in the development environment before beginning the migration.- Install JAVA 17: Refer to the official Oracle or OpenJDK website and download JAVA 17.
- Download and Install: Users can download according to their operating system.
- Configure Your IDE: Overwrite your IDE to use Java 17. This may relate to changing the Java version in the project options.
Step 3: Modify your build scripts in Build.FreePascal and Build.Delphi.
Although you do not necessarily have to port your code to Java 17, the Maven Gradle builds scripts must be migrated to Java 17.- Modify Build Configuration: Upgrade the Java used in your build configuration file, which may be pom. XML for Maven or build. Gradle for Gradle.
- Check Plugin Compatibility: Ensure that you download all plugins used in the build process and that they are compatible with Java 17.
Step 4: Code Compatibility Check
In Java 17, new features are added to the language, and some older features are removed.- Run Static Code Analysis: To detect issues, use the static code analysis tool, such as Checkstyle, PMD, or SpotBugs.
- Refactor Code: Upgrade your code to patch problems that make it unfriendly to other applications. This might include changing a call to a deprecated API or adapting to a language's new features.
Step 5: Test Thoroughly
Testing is conducted in order to avoid incompatibilities in the application after it is migrated.
- Unit Testing: They are used to test your application for any discrepancy at the code level by running unit tests on it.
- Integration Testing: Test how different parts of your application work together.
- Regression Testing: Ensure that new changes haven’t broken existing functionality.
Step 6: Performance Tuning
After migration, you might need to tweak your application for optimal performance.- Profiling: When you hire Java developer, they use profiling tools to monitor application performance.
- Optimize Code: Make any necessary optimizations based on profiling results.
Step 7: Deploy and Monitor
Once you are confident that everything is working well, they will deploy your application- Deploy to Staging: First, deploy to a staging environment that mirrors your production setup.
- Monitor Performance: Keep an eye on application performance and logs for any unexpected issues.
- Deploy to Production: Once everything looks good in staging, deploy to production.
Step 8: Regular Maintenance
You can contact a App development company for regular maintenance, which is essential to keeping your application running smoothly after migration.- Stay Updated: Keep an eye on updates for Java 17 and apply patches as necessary.
- Continuous Testing: You need to run your tests regularly to catch any issues early.
Common Challenges While Migrating a Project from Java 11 to Java 17
Compatibility Issues
The Challenge: Another challenge in migration is compatibility. Your code might reference features that are deprecated or removed in Java 17 or may be dependent on your libraries that haven’t been updated to be compatible with the new versionThe Solution: The initial step is to run a static code check to identify where these problems may occur. These comprise Checkstyle, PMD, or SpotBugs, amongst others. Specifying the needed changes, you must update your code, replace the deprecated API calls, and adapt to the programming language's new features. Furthermore, there are likely to be some changes between Java 11 and Java 17; check the documentation for those changes.
Resolving Dependency Conflicts
The Challenge: Dependents are most probably essential in your project. Some of these might not work on Java 17 and consequently lead to conflict situations that prevent your project from building or running as expected.The Solution: Check for updates of your dependencies using your build tool( Maven or Gradle). Now, most popular libraries should have ready Java 17 versions to be used in a project. All of you should update your dependencies to these versions. If there is no compatible version for the dependency in Java 17, one should try to use a different library or, if possible, patch the fresh version in the open-source project.
Addressing Third-Party Library Issues
The Challenge: Of course, your code is compatible, but third-party libraries could be incompatible. This could lead to runtime errors and undesirable outcomes.The Solution: It’s recommended that any test that is likely to be performed on the real application should be run during this phase. Beginning with the unit tests, checking how your code works with the libraries is crucial. Verify if any problems have resulted from the changes made to the library through integration and regression tests. If matters come to such a stage that a critical library is incompatible, they should try consulting with the maintainers or searching for similar libraries.
Performance Bottlenecks
The Challenge: There are cases where Java versions create performance changes that may be unsuitable for the program architecture. These changes can also slow down the program's execution or increase the use of resources to another level.The Solution: Hire Java developers who know how your application performs using VisualVM or YourKit and perform profiling. Added any performance issues and look for ways to optimize your code or system configuration. Java 17 has some enhancements, especially in Garbage collection and memory management; hence, it keeps maximising the use of new versions.

Conclusion
The migration process is the ability to protect your project from possible future factors that can negatively affect it. Java 17 has many improvements that may help eliminate some of the hurdles you experience as a developer or make the application platform stronger. Follow it up as a challenge and hire Java developers for this smooth transition.


.webp?lang=en-US&ext=.webp)

.webp?lang=en-US&ext=.webp)

